
How to shoot colour infrared on film – by David Hochleitner

Introduction
Every now and then you come across something so different it’s impossible not to ask questions. Having already heard about digital colour infrared and seeing a few alien-looking landscape photos I was intrigued. Think about it, colour infrared with film! This sounded a great opportunity to try something new. After reaching out to David about finding a way to get this out there, we settled on an article.
David’s work is superb – we will get to that later. What follows is what I can only say is a conclusive and useful guide for anyone wanting to try colour infrared.
So please chill out, enjoy the pictures, look at how David achieved this and get in touch. Remember this is all David’s work, I’m here to edit and promote only. For clarity, David has kindly labelled each photo with both the camera and the filter he used.
What is infrared
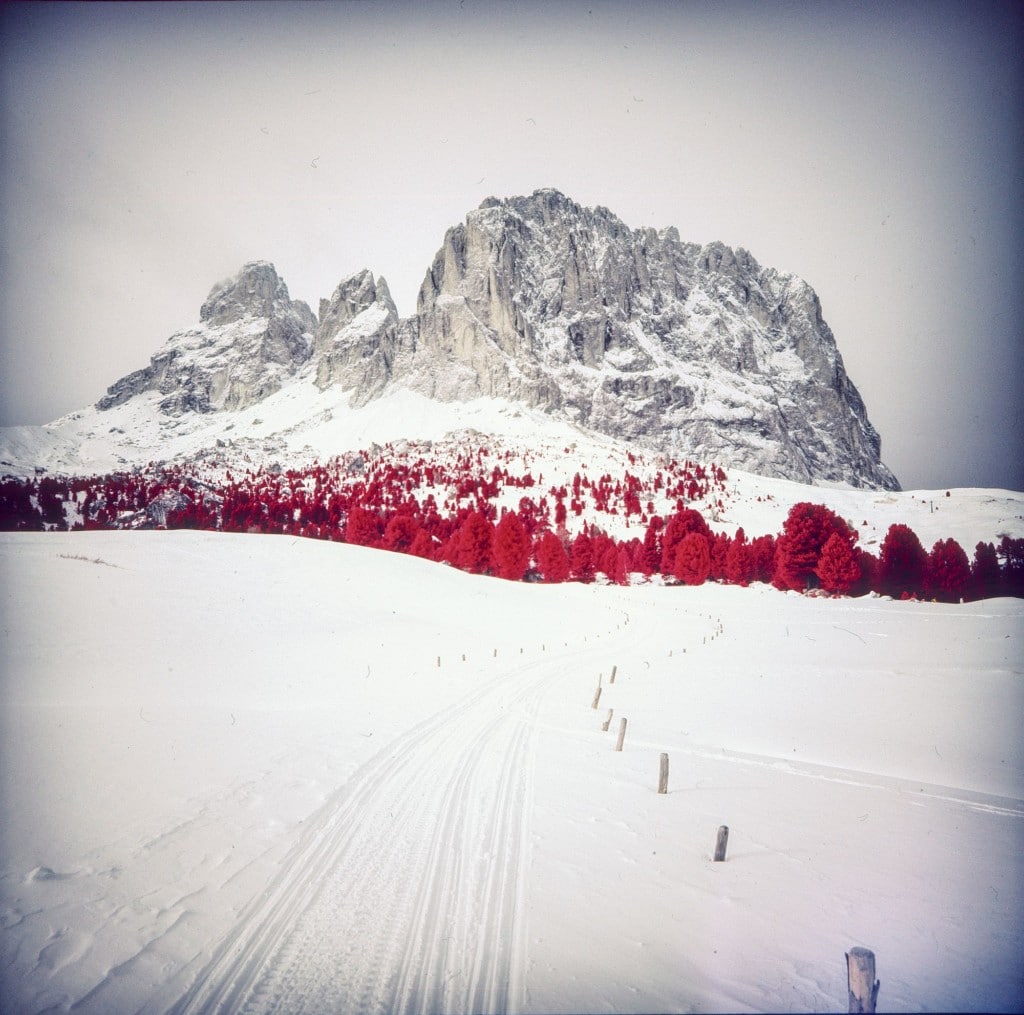
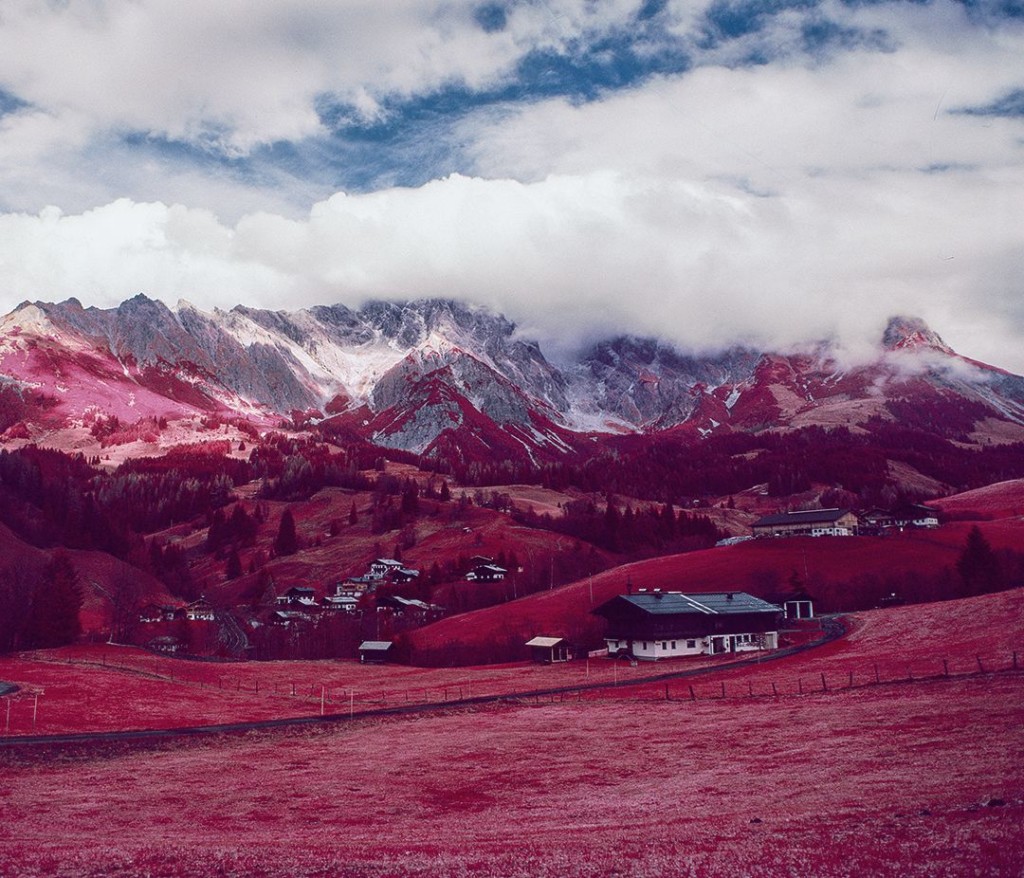
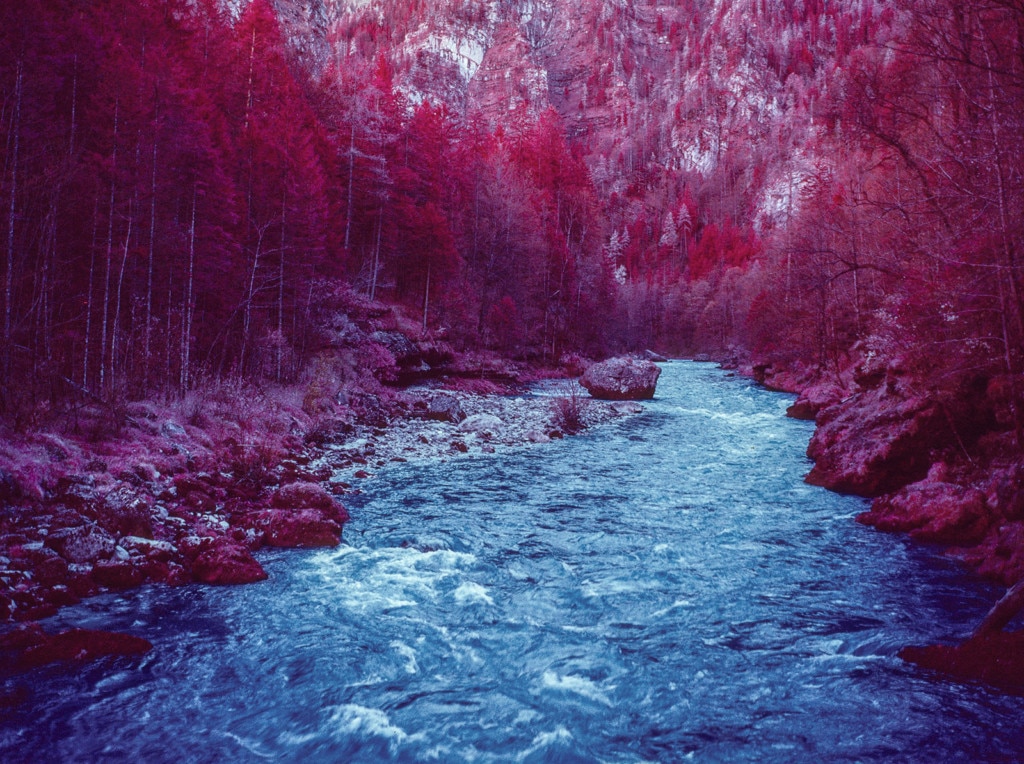
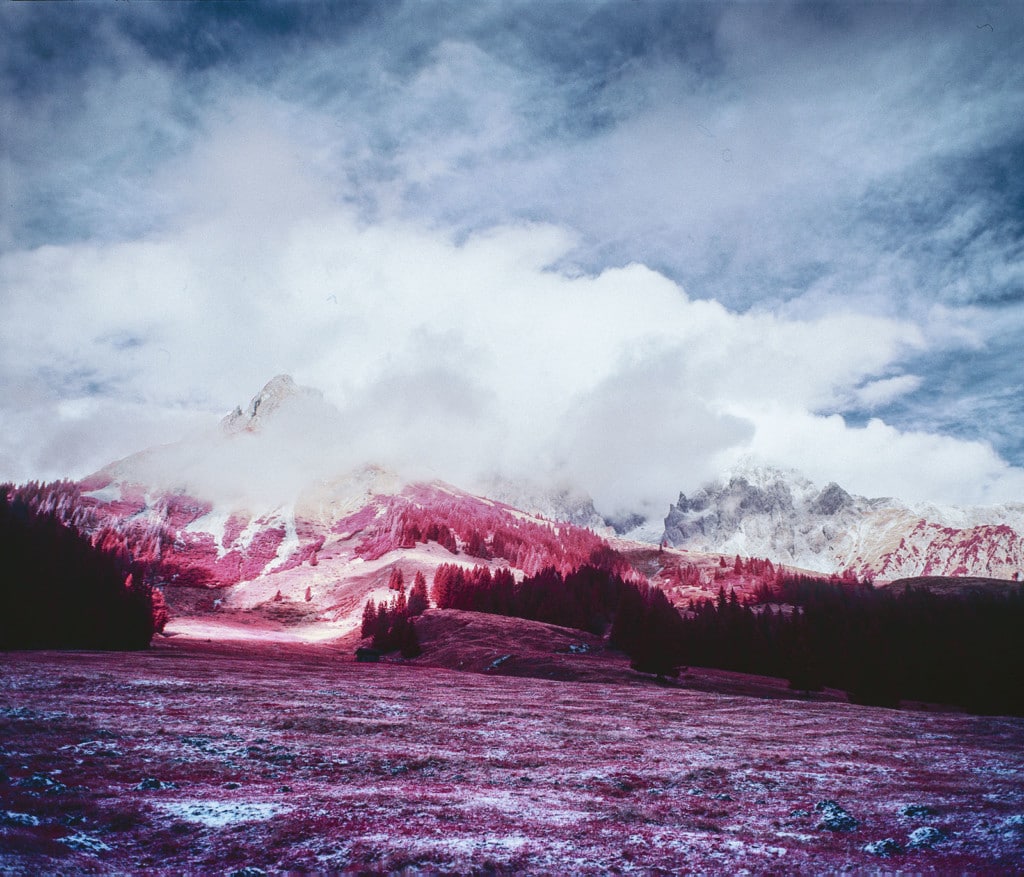
By definition, it’s part of the colour spectrum we cannot see with the naked eye. So technically you need the right emulsion (film) and appropriate filter to capture the light frequency of infrared. Bear in mind by using a filter you are actually blocking parts of the colour visible to the human eye and adding the invisible part of the near-infrared spectrum. It produces shifts in colours that can have amazing consequences – grass/foliage become either white, magenta or deep red, so there is plenty of room for your creativity. Especially landscapes can look amazing and by times bewildering.
Note there is both black and white, and colour infrared, but for the sake of this article, we are focusing on research by David using colour infrared.
Choosing the right infrared film
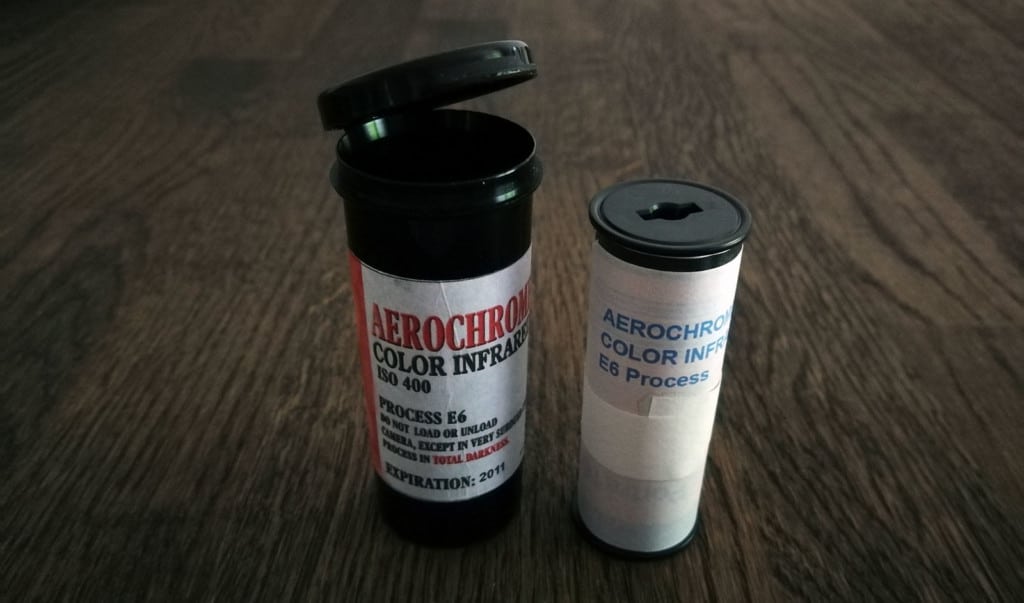
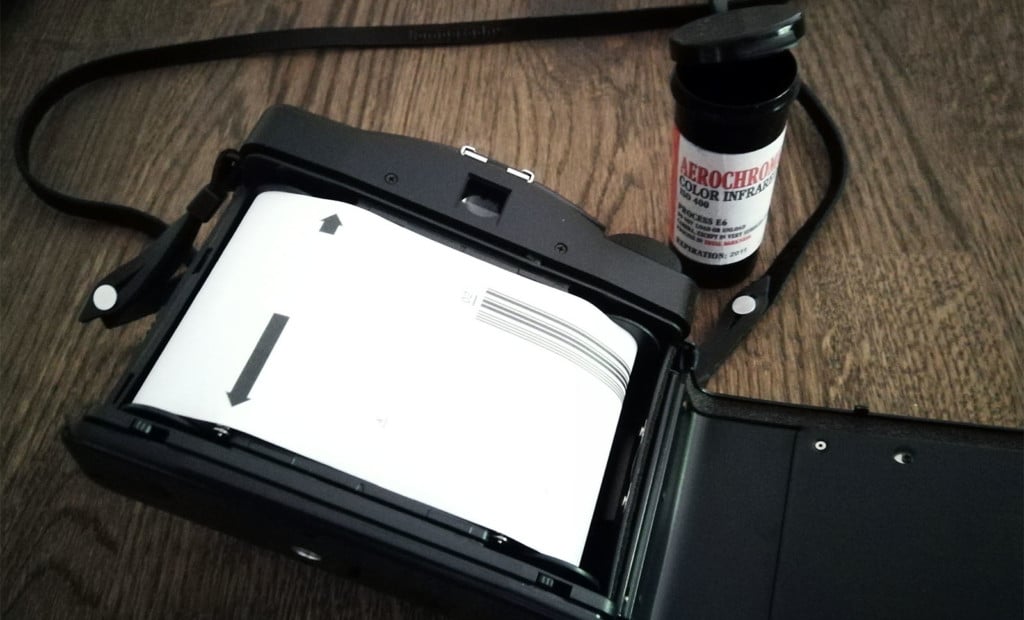
The film we are focusing this article on was manufactured by Kodak and is called “Kodak Aerochrome III” (stopped manufacturing during 2011). Kodak initially intended it for military use to detect camouflage in aerial photography, hence the name. It was meant to be processed in AR-5, but these chemicals are almost impossible to find nowadays. Processing in E6 is the next best thing and works perfectly. You can also cross-process it in C41 to produce negatives. It is important that you use an appropriate filter as it has a heightened sensitivity to the blue part of the colour spectrum. Kodak recommends to use a Wratten #12 yellow filter, but more on that later.
Kodak also produced another film called “Kodak Ektachrome EIR”, which is a 35mm pendant and performs similar but does have a different colour rendition. Some say it is, in fact Aerochrome for normal photography usage, but the truth is that EIR has a different chemical formular and behaves differently. So please keep this in mind. The article is based mainly on my experience with Aerochrome. Kodak Ektachrome EIR is even more expensive and very hard to get.
There is also a medium format film called CIR 120. It behaves similar to Aerochrome, but can only be processed in C-41 chemicals. Its colours are more muted than those of Aerochrome and its initial source is unknown.
Lomography sells a film called “Lomochrome purple”. Even though this film can also produce interesting colours, it is not an infrared film and can not get you the same results.
What format?
Aerochrome was not designed for any mainstream format, as it wasn’t designed for normal cameras at all, so it was only available in large bulk rolls. Dean Bennici (who sells the film) started what he calls the Aerochrome project and sliced 70mm rolls down to 120 format by hand in complete darkness. For further info on the process you can contact him directly, he has also already given some interviews on the topic, which you can find online.
Dean also did some 35mm rolls which are long gone, I don’t know about the process he used there.
So if you want to start using it, you will have to get yourself a medium format camera. Or keep an eye on eBay for some of the rare 35mm rolls.
Buying infrared film
So here we hit a massive hurdle – availability and price, but also you need to consider:
- Every known manufacturer stopped the production long ago
- Colour infrared film is very rare
- It will only go up in price
- Only one known source that still sells first hand
- It’s expired stock and depends on proper storage
The best source for Aerochrome is definitely Dean Bennici. The film in his shop is hand-rolled by himself and you have the guarantee that it has always been cold stored and still usable even though it is expired stock.
The “film photography project” also sold hand-rolled Aerochrome for a while called FPP Infrachrome, those are in fact real Aerochrome in 35mm format. Sometimes those rolls still pop up on eBay, but it is always kind of a gamble because the film is long expired and there is no way of knowing if it had been stored properly by the previous owner. Storing Aerochrome cold is crucial, but more on that later.
The price of the colour infrared film varies. The last rolls of 35mm film on eBay sold for about 35-90€. As I said, you can’t be sure if they are usable at all. Deans prices are not much cheaper, but at least you can be sure that the film will give you great results. Prices at the moment:
120 roll Aerochrome = 35 euros (10-16 exposures)
120 roll CIR = 27 euros
4 x 5 sheets (10) = 110 euros
Considerations
A lot of shots in this article were taken with the Lomo LC-A 120, which is a great camera by the way. I also use a Mamiya RB67, but in most cases, it is too heavy to carry around for me. I like to travel light and the Lomo is a camera that you can always carry with you without worrying about its size.
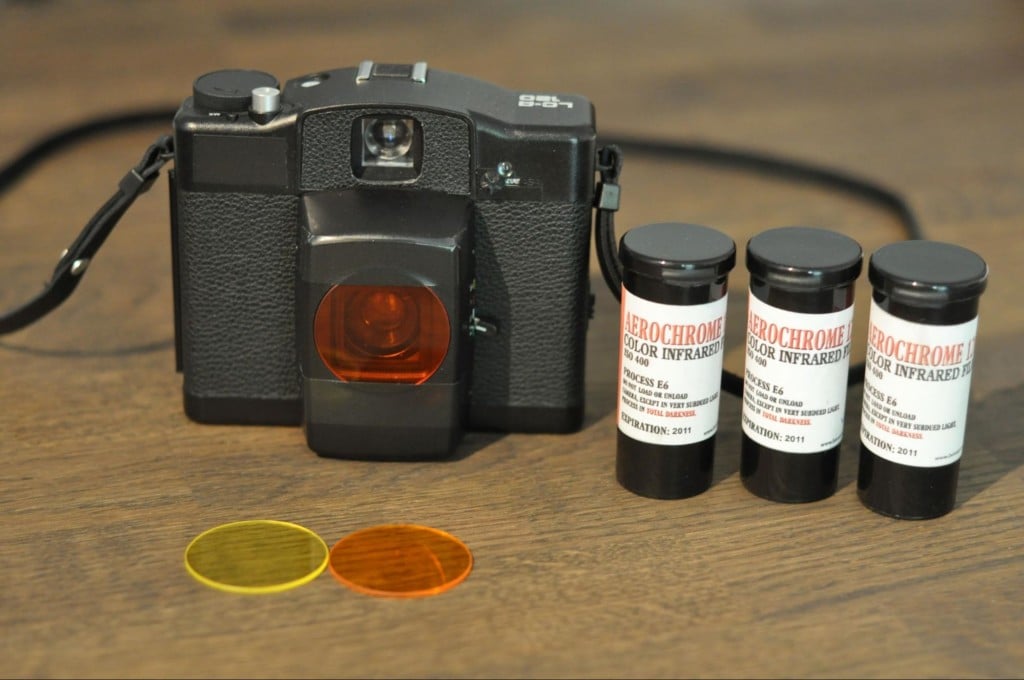
The LCA has a light meter, but it doesn’t meter through the lens/filter. So I adjusted the compensation for the filters by setting the ISO lower. It is important to do this because like a neutral density filter, every colour filter also swallows a certain amount of light, that has to be compensated for.
When using a camera that meters through the filter or through the lens (ttl), I recommend you to check if it adjusts exposure time correctly. Lightmeters that are based on “cds” cells work best.
Some cameras use silicium cells that have a higher red sensitivity which would cause wrong metering because the camera doesn’t recognise the orange or red filter as dark as it really is. Keep that in mind and test your camera before you shoot anything important. Sacrificing one roll for tests is better than losing 10 good shots.
Infrared filters
Obviously as stated earlier, you need the relevant filters on your camera. Aerochrome should be used with a Wratten #12 yellow filter in order to block the blue part of the light spectrum from reaching the film, otherwise, all you get is a tinted image. However, you can use a variety of filters in order to achieve different effects. Using a yellow filter will result in magenta coloured foliage and a slight blue tint in the shadows. Orange filters will remove this tint and give you deeper reds.
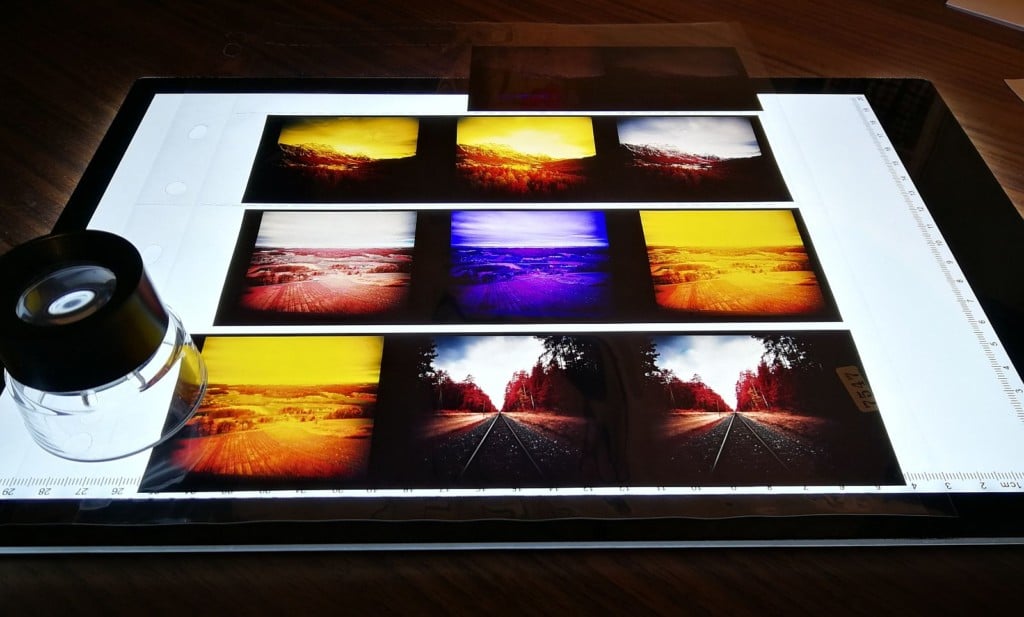
Tests and results
Here are some examples and the results achieved. The factors given by the filter manufacturers don’t seem to be accurate, however. I guess that might be because they were only targeted at usage with B&W film, so forget about them for now. I rated the film at iso 200 for most filters, thus compensating 1 stop. This might not be perfect and you might get better results by metering through the filter with your camera. Remember, if your camera meters through the filter, just set it at iso 400. I only compensate because my camera has an external light meter.
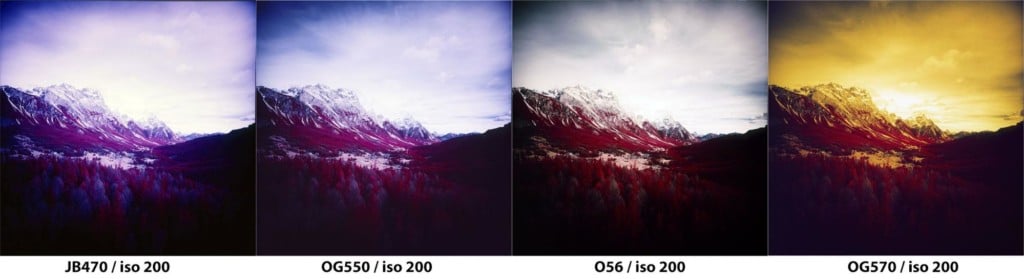
- Heliopan #12 or JB470: yellow filters, perform almost identical. Magenta colours, good while not perfect white balance and blueish shadows. Compensation measured: 0,7 stops.
- 550nm / BW099: orange filter, most versatile in my opinion, less magenta but still a slight blueish tint. Compensation measured: 1 stop.
- O56 / OG2 / CB560 / 560nm: orange filters, seems to be the best choice for red foliage, no tint, strong colours. Compensation measured: 1,5 stops.
- 570nm longpass: a very dark orange filter, causes the same tint as a red filter. Didn’t expect that though. Compensation measured: ~2 stops.
- Red r1: causes yellow tint, didn’t add a photo, for most uses the tint is too strong, but could be used in an artistic approach
- Hoya r72: Do not use a filter like the Hoya r72, those are only for B&W infrared film.
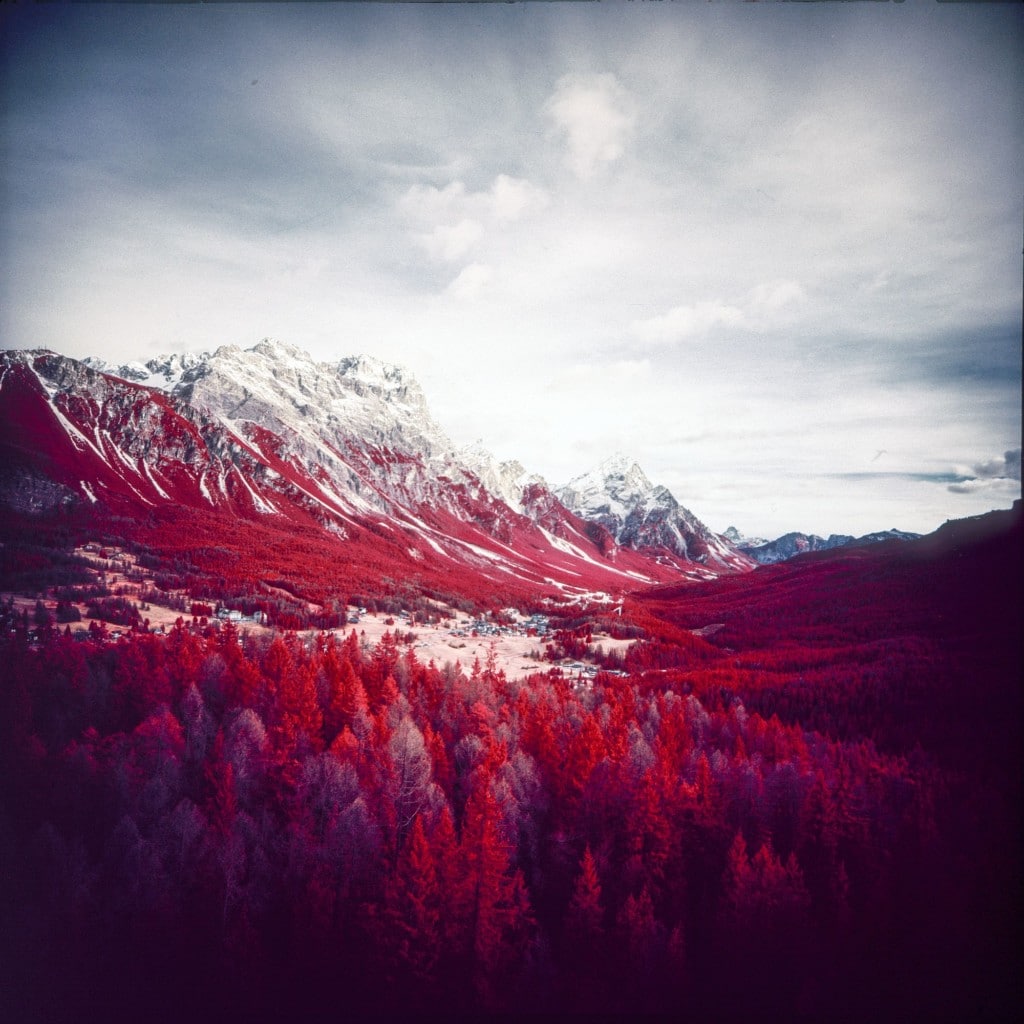
The shots presented were all taken with 120 Aerochrome developed in E6 for slides. I scanned the comparison shots with an Epson V800 with SilverFast and only did some slight histogram adjustments on some shots. No other adjustments so far! Of course, the tiffs have quite a lot more room for brightness adjustments than the jpg. For comparison reasons, I left them untouched, however. Below you can see the O56 shot after further brightness and contrast adjustments.
Storage & Preparation
While some say they had the film outside the freezer for two months without problems, there are also claims that the film degenerates even quicker. A photographer from Australia told me that he had problems due to “high” temperature causing a slight red tint over the whole film. Also, keep in mind that loading straight from the freezer can cause nasty condensation marks on the film.
So storing the film cool when not in use crucial, defrosting it slowly too. Richard Mosse claims he always used beer coolers when shooting in Congo.
I did some tests with a roll that I kept loaded in my camera for a month and didn’t have any problems at all. I kept the camera in the shade or in my bag when not in use without any further cooling. However, when exposed to heat or stored incorrectly over a longer time period, film degeneration can become a problem.
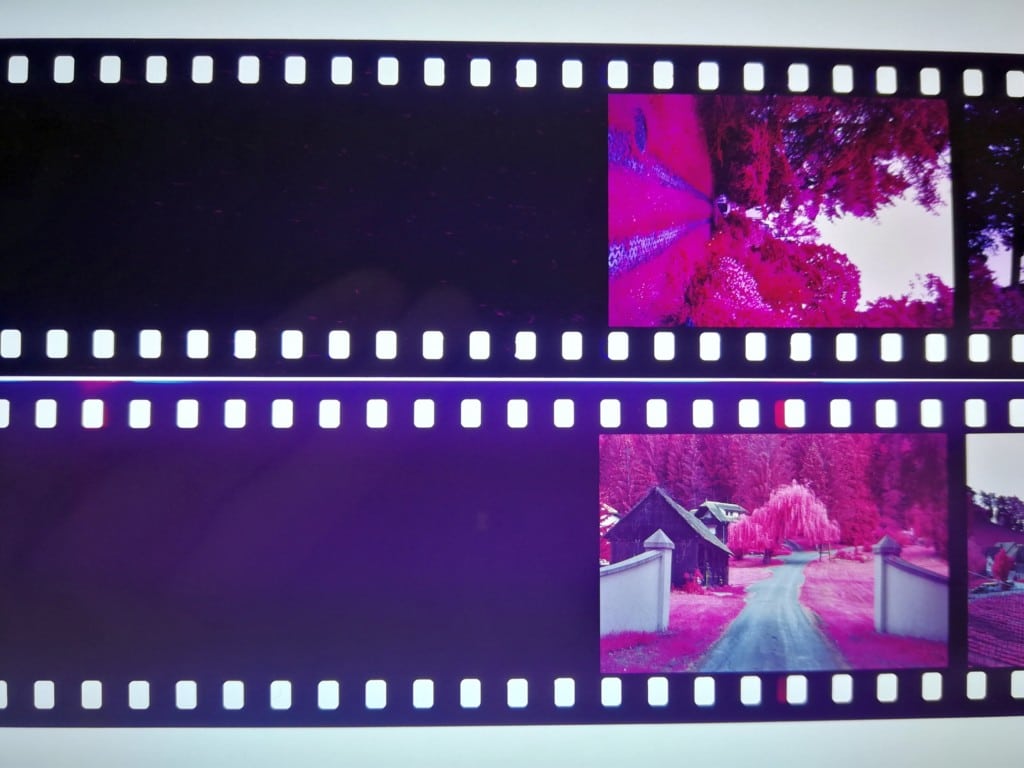
While the film on top was stored frozen when not in use, the one on the bottom was stored cold but not frozen over a period of about 5 years. This causes the blacks to shift towards violet and causes a slight tint in the images. You can partly counteract the effect while scanning, I would recommend using an orange filter with such a roll of film. A yellow filter would make the blue’ ish tint even more pronounced.
Rating the film
You should rate Aerochrome iso 400 on the ground while reducing its sensitivity down to iso 40 the higher you get above the ground. This has to do with it being an aerial film and can be ignored as long as you don’t shoot it from an airplane.
Dean Bennici recommends you rate the film iso 400 for the yellow #12 filter in case your camera meters through the filter, thus compensating for it automatically. Rule of thumb is not to overthink it. If your camera meters through the filter, iso 400 should work. If you use an external meter, start with iso 200 and adjust after you see the results from your first roll.
Loading the Film
Loading the 120 film should happen in subdued light. In fact, I didn’t have problems loading it in my car or in the shade, just avoid strong sunlight. The backing paper of the 120 film rolls does a very good job of protecting the film.
With 35mm infrared film, however, you have to load and unload in complete darkness as it doesn’t have any backing paper like 120. Infrared-light has a nasty habit of creeping in from the film leader like liquid. So exposing the leader can cause damage to the whole film. This has to do with the missing anti-halation layer. Keep this in mind when buying a 35mm rolls from eBay, you never know if the previous owner has opened the can and exposed the film to light before.
Choosing a Camera
There are a lot of suitable medium format cameras out there that work perfectly fine with Dean’s 120 Aerochrome film. Most will require you to use an external light meter, which isn’t a problem. If you get your hands on some 35mm film however keep the following in mind:
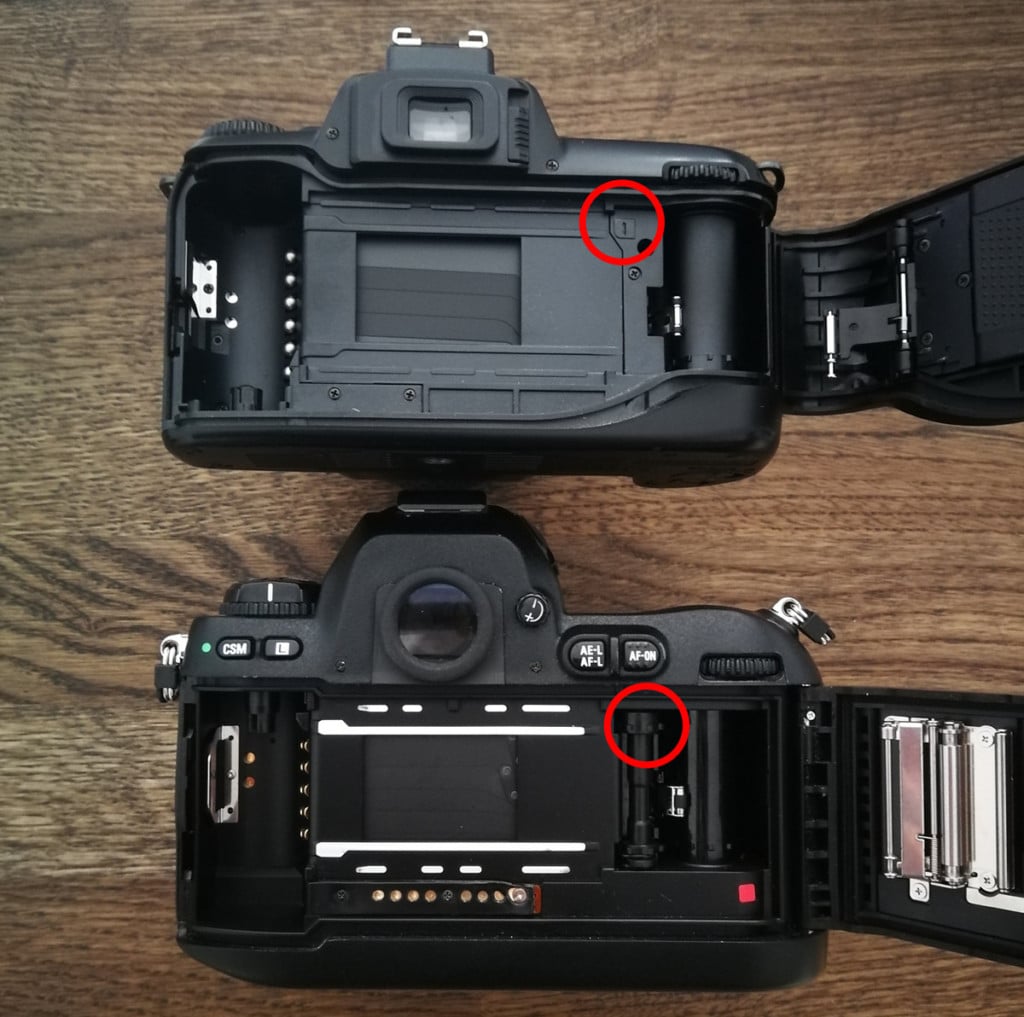
Older cameras usually work best for infrared film, because they often use the before mentioned cds-lightmeters and mostly use a mechanical way of counting the frames. Newer cameras often use little infrared-emitting diodes to count the sprocket holes of 35mm film. While those diodes don’t harm normal film, they can cause light streaks across an infrared film that senses exactly this type of light. Luckily it is pretty easy to spot whether your camera is usable or not.
Taking Pictures
“Don’t worry, just shoot it!”
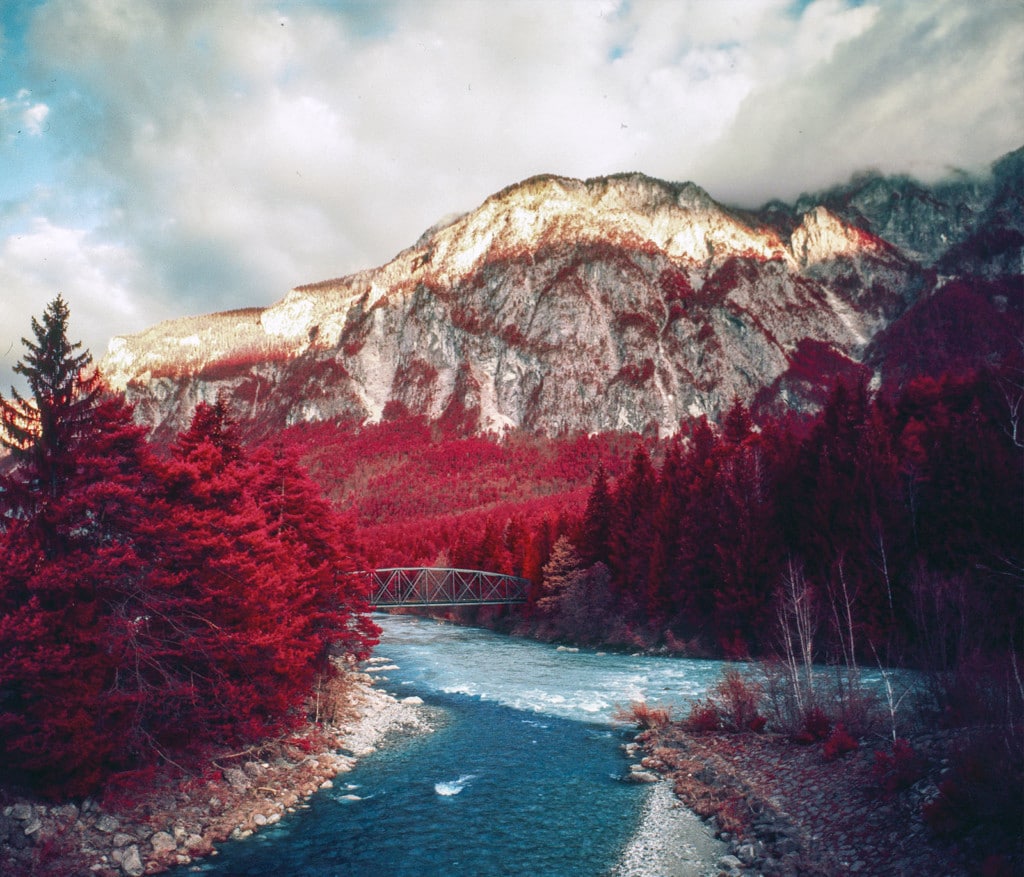
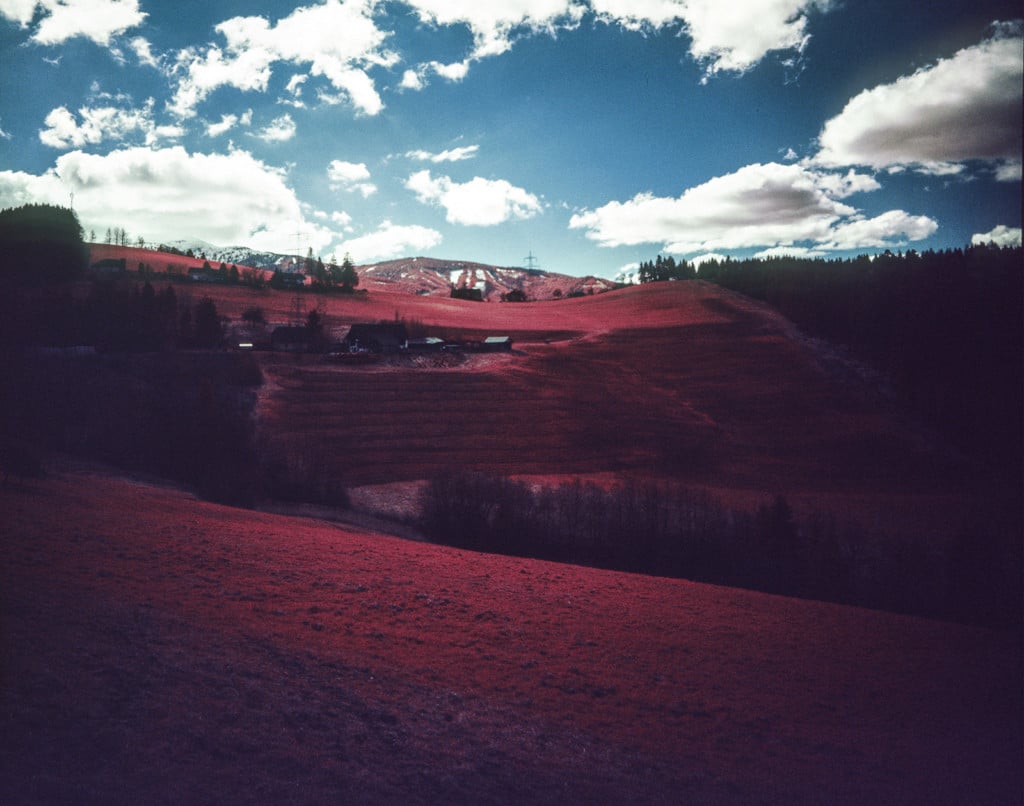
Shooting the film is pretty straight forward once you got past the hurdle of loading it and setting up your meter. Just keep in mind that good composition is just as important as in normal photography. You shouldn’t get stressed because it may be a hot day, so take your time when composing! I often try to get water or rocks in the frame to counter the intense red tones. You can shoot in any weather, it doesn’t matter if the sun is shining or if it is an overcast day. Even winter is a great time for some infrared fun. Just keep in mind that Aerochrome is a slide film and has a very low exposure latitude. So in scenes with high contrast, you will either lose all detail in the shadows or you will have a blown-out sky that presents itself almost white with very little details.
Focusing is not a problem with Aerochrome. While b&w infrared film demands a focusing shift according to your lens infrared index, Aerochrome captures enough visible colour information that such adjustments are unnecessary. I shot the image below at 50mm f1.4 and the focus is sitting just where I intended it to.

Developing infrared film
Developing Aerochrome is another story, all infrared light sources in the lab have to be shut down and some sensors in the machines must be deactivated. I have no idea about all that, I just send it to Foto Leutner in Vienna, they have done a perfect job so far. They process the film in E6 for slides. I recommend you contact your local labs and ask if they have developed infrared film before. If they haven’t, don’t give them your film.
Dean Bennici has a list of recommended labs in various countries. I recommend you ask him for advice on that matter.
End thoughts
There is A LOT of false claims and speculation about this film online, that’s why I did extensive research before I started shooting it. I also did several tests to get used to its performance and quirks. If you consider a few things, it is actually very easy to handle and you will get very good results from it.
If you like to see your surroundings in a completely new way and love the surprises you sometimes get when your film comes back from the lab, then I urge you to give Aerochrome a try! I am sure you won’t be disappointed. It is a whole different analogue experience and there is no way of knowing how long you will be still able to get this unique film. Although there are ways of emulating its look digitally, the results are not the same and the experience is very different.
If you would like to see more of my work for inspiration, check out my Instagram profile:
https://www.instagram.com/elopan_photography/
Conclusion
It really is a compliment to work with people like David, allow them to introduce new thoughts and genres. The creativity to use this film will take careful thought, but after David’s advice, you should be able to formulate something.
Just remember what David’s said, meter for iso 400, think about the temperature and be careful loading. We hope you follow his work and purchase some film from Dean Bennici.
MORE FROM THE PHLOGGER
If you like the above article then check out:
Hi – thanks for the article. Just wondering which filters you used for the Lomo LCA 120? Cheers.
How to mirrored lenses glasses ? despite light balance?
If light balance is either lighter or darker one side/eitherside of the mirrored/flash-coating glasses lenses how to keep the mirrored effect consistent and one way – is this even possible, if so please sir how?
I’ll pay you ten grand if you tell me within a year
Label returned email as – lenses glasses ? mirror-effect
Thank you