2 insights into digital manipulation using Photoshop
Digital manipulation by Jay Good
My name is Jay and I have the pleasure of being this edition’s guest writer. I have been taking photographs since before digital camera’s existed. Having experienced the joy of having a quality control sticker plastered across 4×6 prints of a 24 film roll.
Since getting a digital bridge camera many years ago I was fascinated by 2 main elements. These are the premise of digital images and digital manipulation techniques.

Know your package
There are a few packages for digital manipulation (depending on your platform). As a Windows user, I am not sure what’s available for Mac other than Photoshop.
For Linux, Mac and Windows, there is GIMP, which is a free ‘photoshop style’ editing program.
There’s also Affinity by Serif, which is a photoshop clone. Affinity is available for a one-off payment of about £40.
Then, of course, there’s old faithful, Adobe Photoshop. Currently, the latest package is available in a bundle with Adobe Lightroom for £10 per month.
‘What’s the difference ?’ i hear you cry.
After a bit of getting used to the menu systems, the programs are much the same in layout and functionality. Where Photoshop differs is that it has the functionality like 3D and animation etc.
Learn more
One of the best things I can suggest is, have a look on Youtube. There is a myriad of great sites and channels dedicated to these packages and their techniques. There are some fantastic instruction and tutorial videos. I began watching Deke McClelland’s website.
The Techniques
The basic techniques show one of the most powerful principles of image manipulation. This is a foundation technique for any budding re-toucher – ‘Layers’
The premise of layers in photo manipulations are exactly the same principle as that of early animators. How crazy is it to think that in some small way Tom and Jerry paved the way, at least in principle, for today’s image manipulation programs?
Animators would draw and colour the majority of a frame, and then have several acetates overlayed with minimal changes. Very similar to flick books we all used to create when bored at school.
Layers are a digital ‘flickbook’ style technique, that can be used for altering or adding effects to an image. It should also be noted that you can stack layers, and hence have multiple layers with multiple styles or effects applied to images.
The Guides
To showcase examples of layers I have provided PDF documents to two basic techniques, these are:
The first is basic but a cornerstone of all manipulation techniques, demonstrating the possibilities of layers and masks.
The second highlights a way to use the knowledge gained from the first technique to boost highlights and darken shadows. Commonly known as ‘dodge and burn’ which is a technique that is a non-destructive way of editing.
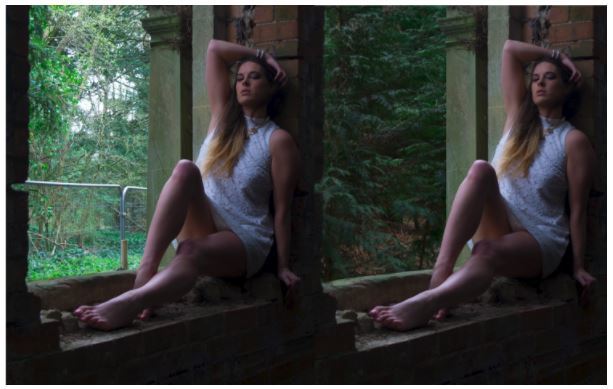
Using the techniques outlined (and one or two others not mentioned here) I managed to salvage a shot I liked. By removing the distracting chain link fence element, I replaced it with trees and foliage from another shot.

Finally
If you found the articles interesting and informative, look Jay up on Facebook or Instagram.
Jay is a happy smiling family person who cares about the quality of his images. His editing and retouching skills are first rate, after watching him recover underexposed images from darkness to something usable is like watching magic.
If you liked this article sign up for the newsletter.
Do not forget to check out recent articles:
Keep watching out for interviews, so far we have a model, a natural light photographer and an American photographer.American photographer.
Guest writers always wanted, email enquiry@phlogger.co.uk
