
6 steps to start podcasting
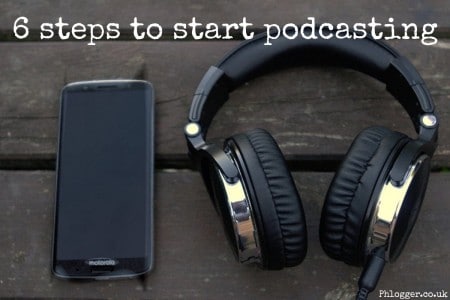
6 steps to start podcasting
Everybody has heard about podcasting, some people listen and some take part. You might be wondering how easy it is to get started (very), so this article should help you. The 6 steps are produced in chronological order, so it’s very clear and easy to follow.
After this I have provided a FAQ type section telling you about a few problems you may have and how to resolve them. So without further ado here are the 6 steps to start podcasting.
STEP 1 – Preparation
If you research and carry out your due diligence the whole process will make it easier. For instance, consider these questions when working with others:
- how are you contacting each other?
- is there a pre-arranged time?
- how long will it last?
- how does the podcast process work?
- do they know it is being recorded?
- can you use profanities or is a clean show suitable for all?
- will you edit the podcast?
- what information goes on the summary + whose artwork?
- how long before it goes live?
They are straightforward questions and you have so many ways to answer these.
You could:
- create a video and post them a link
- write a document (word/powerpoint etc)
- do a podcast
- send over some preformatted email/text message/social media message
There are many options, but its just as easy to send a link to your current podcasts. Tell them to have a quick listen and see what they think. This way you get someone listening to your work too and might actually subscribe too.
Research
One of the most useful elements that will help you is researching, both the content and any parties taking part too.
- plan the content
- research the topic/guest
- have plenty of questions
Having a clear plan for the event will help the quality and flow of the podcast. The less time you spend saying “er” and similar the better. Knowing what you want to say and when is important to give the content some meaning.
Using tools such as “Google docs” is a useful tool for your planning. This allows me to create a simple bulleted list of points to discuss (which can then be stricken out when complete).
Depending on the length of the session, you might need to break it up into multiple segments too.
STEP 2 – Equipment
When you are ready to start podcasting you only need one piece of hardware and software.
- a smartphone
- anchor.fm app (see link here).
That is enough to get you started, the inbuilt microphone will work. Once you learn more about audio and editing you can progress.
My tips are straightforward but they are applied to all my episodes. You should:
- do the podcast somewhere quiet (microphones will pick up background noise)
- have a charged mobile phone
- your computer device ready (in case you want to make extra notes)
- patience (you may mess up)
If you are recording with others you need:
- the other persons contact details/method (social media/email etc)
- a link to the podcast (to send to the other party)
- headphones (to listen to the other party)
- microphone (to record your voice)
- microphone + headphone adapter (may be required for some mobile phones)
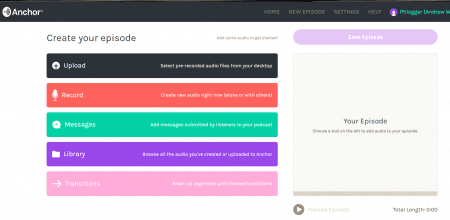
STEP 3 – Recording
The instructions differ slightly between recording yourself and working with others. Each screenshot shown below goes through the steps below.
Recording alone
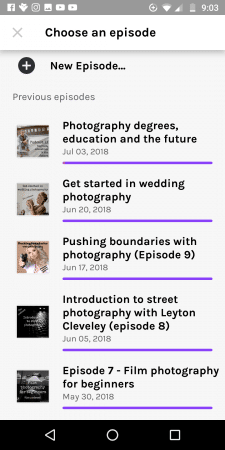
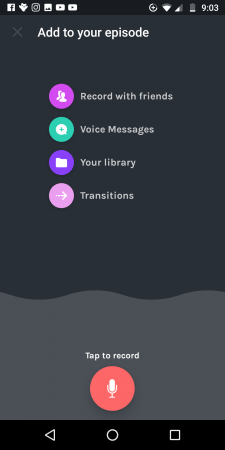
- Once you open up “Anchor.fm” app and select the down arrow (top left of screenshot).
- choose “NEW EPISODE”
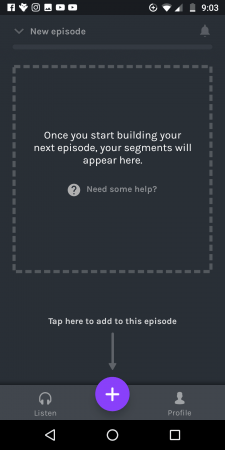
- click the “+” icon
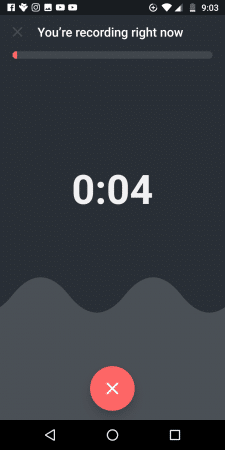
- press the “red icon” to record (you can swipe to keep recording)
- you always know how long you have been recording and can stop anytime
- you can remove, save or play the recording when finished.

Recording with others
Continue up to step 4 above, then:
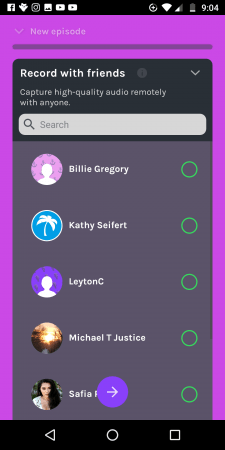
- choose “record with friends”
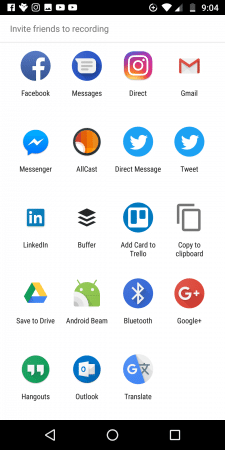
- if its someone previous you can use the “radio button” otherwise click the “ARROW KEY”
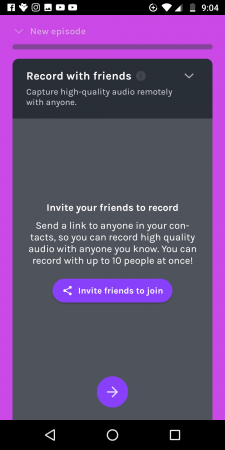
- click the “INVITE FRIENDS TO JOIN” button
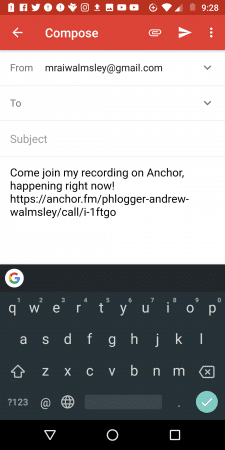
- depending on your phone you can choose an app to send the link
- this shows the example link within Gmail
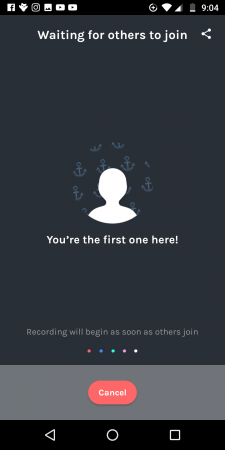
- you will get some background music while waiting for others to join
- the other person is asked if you want to join
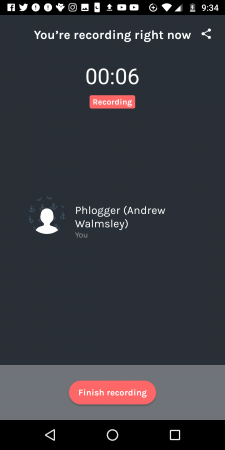
- the app tells you who is connected and the length. click “finished recording” to end
- the organiser can choose to wait for push notification for the recording


STEP 4 – Editing
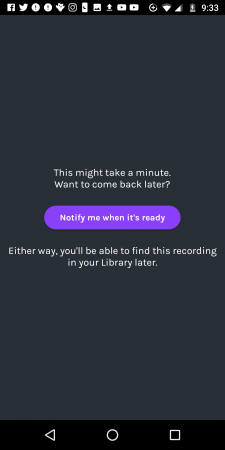
Once you have finished the recording you will get a notification to say “finished processing”. You can then access your audio and immediately start publishing. This may be okay for your first session, but it’s worth listening to your recording first as a minimum.
You should edit to:
- remove background noise
- increase/decrease volume
- remove mistakes
- remove excess/gaps
- add music/intro/outro
- adjust dynamic range
- tag audio
This article is only designed as a brief introduction, so we will not go into too many details. But the steps I carry out are:
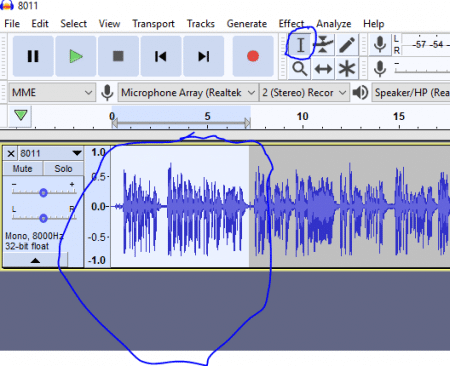
Trim
Remove any mistakes/excess discussion not relevant to the podcast.
- open Audacity and add your file
- highlight the selection by dragging (ensure the “I” icon is selected)
- click “edit” and “cut”
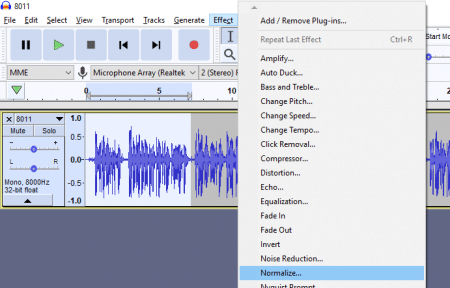
Effects
It is useful to use the effects menu to adjust the compression (usually set this to -21db) and then also “normalise” the sound (set to -2 db). Between these methods, you help the dynamic range of the voices and level out any differences between anyone else recording. So if you have a person with a louder voice or is very close to the mic, the normalise will adjust this to be in line with yours.
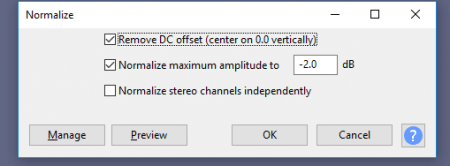
If you look at the waveforms of the audio below you will see the before and after examples. Look at the peaks and you will see they are much smaller, this is more apparent when you have multiple people recording together. Please note normalise should be the last part of your editing.


Export
It is always useful to export as mp3 as they are much smaller, it will save you time uploading back to your anchor account. Anchor also has a limit on file size too, but they automatically convert mp3’s anyway.
When you are happy with your edit and listened to it to check it, choose “file” and “export as mp3” to sort your tags. In this example, I have put information relevant to that (fake) episode.
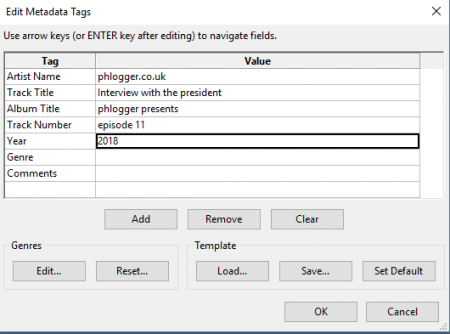
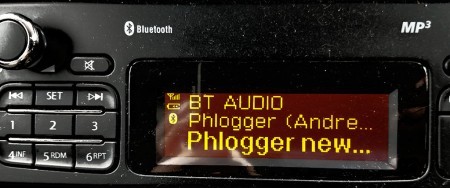
You should always provide mp3 tags, so when the podcast is played on a radio/stereo the relevant text is displayed. It is a specific standard (called ID3) so should be used on any player you use (even in your car – see picture below)
STEP 5 – Publishing
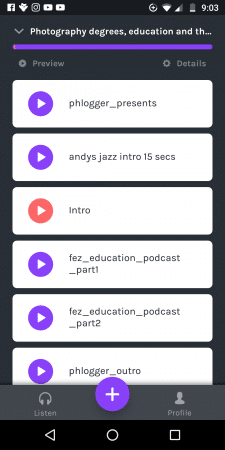
So now you have your audio sorted, upload that to your anchor account and move it into the relevant episode.
Personally, I use the “library” function to add intro/outro’s to my work, since they remain there. So its really handy to upload your main element, then just add any intro/outro/music from the above anchor page. This also provides you with the chance to record anything missing and add at the last minute (no-one is perfect). You can then drag your audio in the order you want (intro at the top sort of thing).
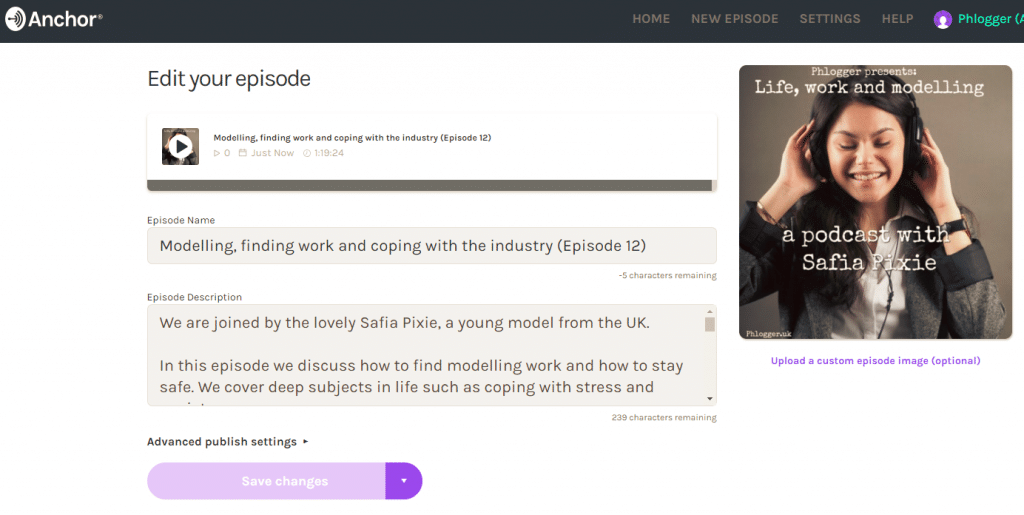
Cover Notes
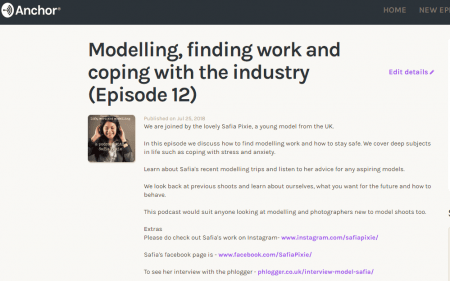
Your next section is the notes for this episode. So if you remember back to your planning, you can add details of what you were discussing. But also from making notes during the podcast, you can refer to this for anything useful. So in a couple of the interviews, I noted down some funny responses and used them here. For example, I used “find out why Jeni took photos of slippers” on Jeni from Signature photography podcast.
In here you should include any relevant links to what you have discussed and co-hosts websites/social platforms. As you can see from the screenshot, it recognises the url as hyperlinks.
Art
It is essential to produce cover art, if you are branding then maybe you will stick with the same each time. But for others, you will want to make this relevant to the topic and podcast. In my examples, I try to use a photograph of the person or the subject matter (film camera or picture of a street etc).
My favourite method to create such covert art is an application called “stencil”. The app allows you to upload your own work, but also there are thousands of stock images too. You can easily add layers of text and move this/resize. Once finished you can share immediately through the usual Facebook, Twitter, but it also has “buffer” too (which I have written about in the past). Each image is designed around an image size so it has presets for social media and blogs.
Obviously, you can use any package to make your artwork, but I have had an account with this company for a few years and can see all my previous work, so can ensure its similar for branding purposes.
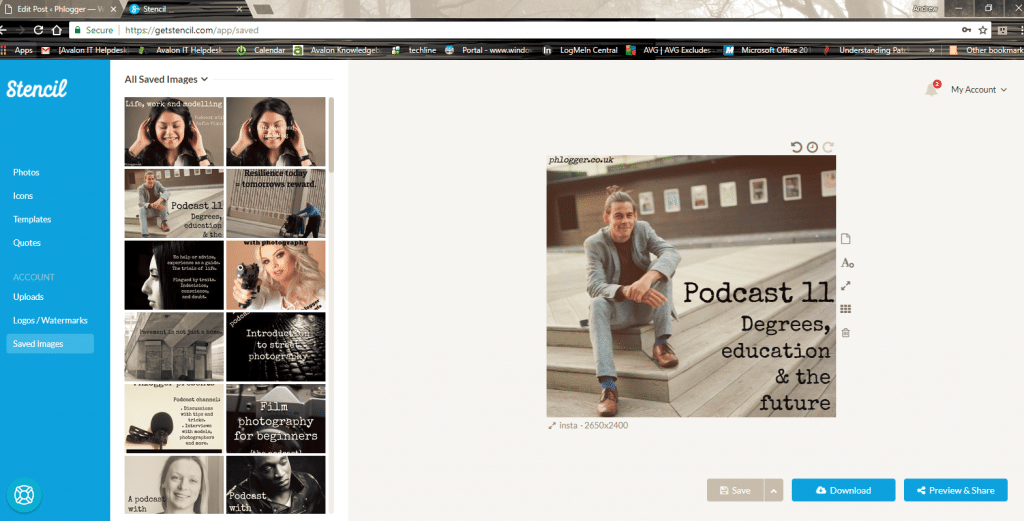
Once you have the artwork, simply upload back to the same episode, says “upload a custom episode image” as shown below. It’s the same page as your cover notes, so this is your chance to do any last minute edits.
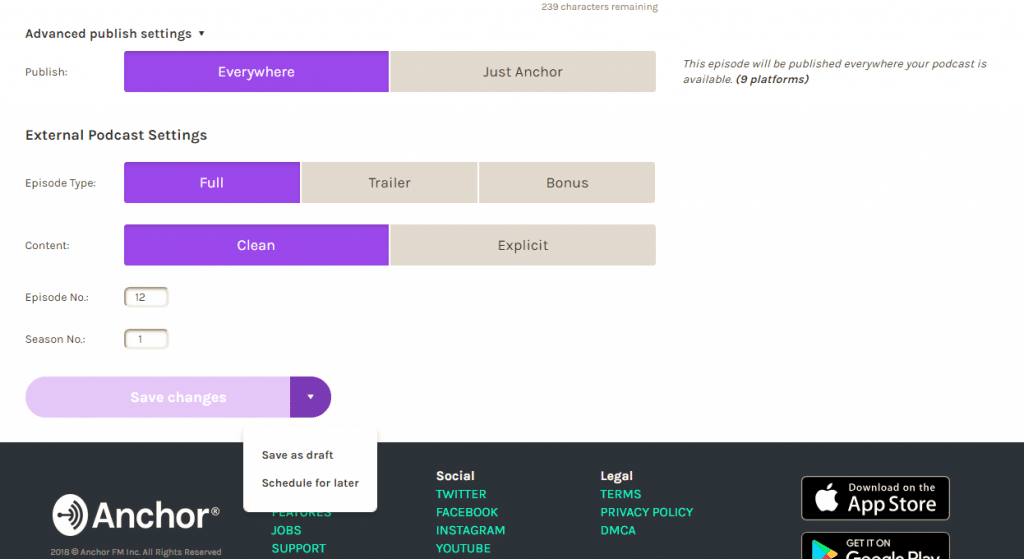
Publish
After your show is finished, it is time to finally publish your work. Of course, Anchor makes it easy for you by offering simple options. So select “everywhere” and Anchor will start publishing this around the likes of iTunes, Google podcasts, Radiopublic, Spotify etc. Just be aware if this is your first episode this can take days, weeks or a month before its published everywhere.
In this example, I always want the work everywhere, and always ask guests to refrain from swearing where possible. I also use the episode number just really as a reminder of how many I have done.
Then click the publish button (it shows save because I’ve already published this) and if you select the drop down you can actually schedule too. Scheduling can be very handy, especially if you have finished this late at night when your audience maybe asleep.
STEP 6 – Marketing
The product
Now the hard work in the planning, taking part and editing is done, it’s time to do something useful with it. Having a podcast on Anchor.fm is not enough by itself. You will need to promote and share this work in a suitable environment.
For some podcasts, the content alone is enough, because of the high quality. Shows such as Medicine remixed and “the great everything” are very unique. The people behind these put care in their work and have fun and interesting content. They also have the right personality, delivery and voice to go with it.
I cannot help you with your content, nor can I advise where to put your work, but promote in relevant groups and social sites. Ultimately your podcast will do well if people like your content.
Promotion
If you want people to listen to your podcast, you can send the public to your anchor.fm feed. But I would suggest caution here and look at the other options. Once your show is published on the other platforms (iTunes/Spotify) etc, it may be wise to promote links to these instead. Because there are more people using iTunes and Spotify this make increase your chance of being spotted.
Also with iTunes, the public can leave reviews too.
Player
Another point to consider is the length of your show, not everyone will have time to listen all at once (shorter the better). So you need to look at the other platforms like “radio public”, that allows you to “resume” your position and automatically download future episodes and subscribe.
Remember most of the apps allow people to download too, so they can listen “offline” and not waste their data on mobile phones.
Links
If you go to your anchor.fm homepage, it provides links to all the platforms your work is published on. This will allow you to copy and paste to your audience.
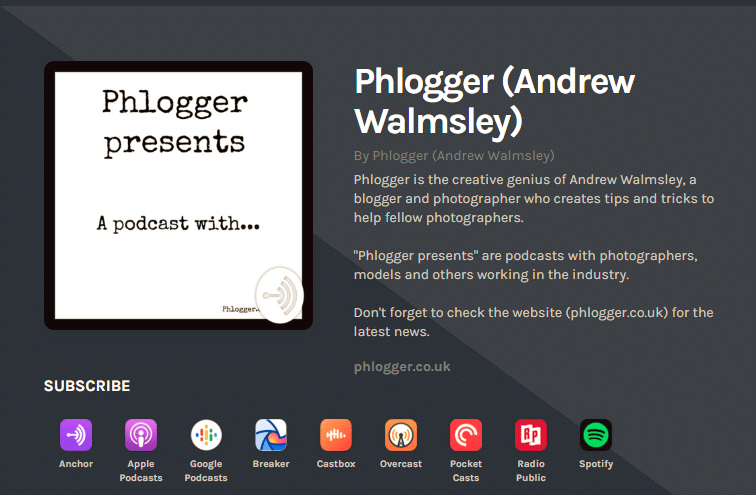
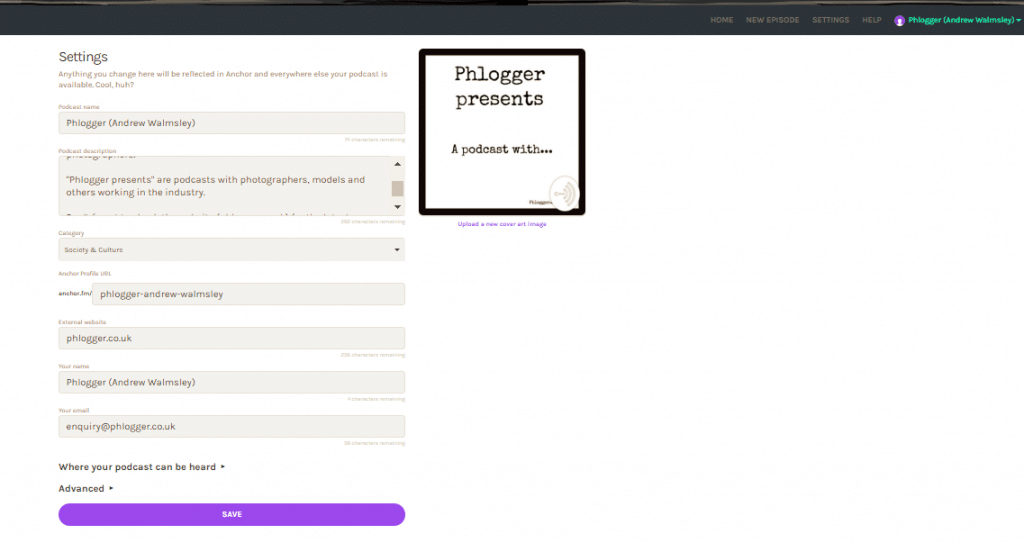
You can also find your RSS feed too, which can be used. To find this back to your anchor account and choose “settings” from top right.
Problems
Podcasting alone
AIf it inevitable you will come across problems in your first sessions. Just remain calm as you would taking a photograph (if you are a photographer).
You may talk gibberish, forget something or have a sudden silence – don’t worry. Practise makes perfect and don’t forget you can edit anything out anyway!
Podcasting with others
If you come across an issue in this scenario, keep the other parties informed of what is going on. Tell them what you plan to do or want to try, to keep the show going. Remember the audio can be edited or removed completely. Have you got a backup way to contact the person in this scenario? It’s useful to have contact details on hand.
Frequent issues
Broadband – Your broadband will be one of the prime reasons for failure, so are you still connected to the web?
Wifi – it is not an exact science, it can be affected by elements where you are (even people). Ensure your wifi is fine before undertaking a podcast. If you continue to have a problem, try restarting your phone and arranging another session, it is really quick.
Anchor app– the company are heavily reliant on their infrastructure to host your podcast. One change here and this could be problematic for all. Check out their Facebook group and see if anyone else is affected (it’s a very friendly and useful group).
Publishing – you may not see your podcasts on iTunes or google and wondering what is going on. Please be patient, Anchor is such a success they have been overwhelmed with requests at this point in time. A number of people witnessed this during April 2018, but Anchor.fm started responding to support requests. If you have waited a few weeks and nothing has happened, then send a request through to the anchor support email.
One way audio – check your volume button, it’s very easy to catch mute! If you are using a microphone you will only be able to speak through your phone and NOT hear anyone else.
Podcast finished – sometimes the podcast has suddenly ended for no reason. When the recording is finished you will receive a notification. Just start again and inform any guests if necessary, you can merge recordings together so it can be fixed.
Cannot join – on one occasion a guest was waiting to join the session like us, but nothing happened. To fix this a restart of the phone was required, then open the app again and start a new session.
Cannot hear – if you are talking with a guest but cannot hear them, check your audio connections! If you are using a microphone connected to a mobile, you might not be able to hear and speak together. A special adaptor is required to allow speech and listening at the same time (it has Mic and headphone socket).
The Future
Once you have experience and start hitting barriers, you will want to start looking to the future. Improvements can be made to all the above steps. For instance, you could:
- host podcast on a professional platform like Blubrry
- record using skype or paid service like Zencastr
- use professional microphone & audio equipment
- upload to iTunes/other platforms yourself
- advert your podcast
- use a service like Patreon to find subscribers
These are just suggestions, each person will have their own thoughts and suggestions here. It is inevitable my work will progress and evolve too, so keep watching!
Conclusion
Thank you for reading this work. Don’t delay, record and publish your show now. There is a great community of people around to help you.
Issues and problems will happen, so the additional content provided will help you with a few solutions. Life is full of challenges, learning new skills is great for your mind.
Don’t forget to check out my show to hear what podcasting is all about. If you like it please share it on your social feed and leave an iTunes review!
When you have published your show let me know, I would love to listen to it!
Phlogger